
Tired of sacrificing your evenings manually recutting your YouTube videos to try and break into TikTok or Reels? This clip guide is for you: it explains how to use the power of artificial intelligence to recycle your long content into dozens of dynamic clips without any technical effort or complex skills. Here, you’ll discover the precise settings to achieve perfect cuts, automatically generate animated subtitles, and multiply your reach on social media in record time thanks to a formidable repurposing strategy.
In short: Looking to turn your long videos into viral content without spending hours on it? Opus Clip automates the entire process. For those who want to get straight to the point, here are the direct links:
What exactly is Opus Clip?
The principle: to transform the long into the short
Imagine taking an hour-long podcast, interview, or endless tutorial and extracting only the essential elements. Opus Clip does exactly that: it automatically breaks down your large files into several short, impactful sequences. Think of it as a mini Opus Clip guide for intelligently recycling your content into a vertical format.
No need to spend hours poring over the timeline to find the gems. AI analyzes everything and selects the most relevant moments to isolate for you. The goal is simple: to save you a ton of time in post-production.
This is therefore the ideal solution to be present on YouTube Shorts, Reels and TikTok without having to create content from scratch each time.
AI features that get the job done
The “ClipAnything” feature is a game changer: it allows you to cut out any type of video, not just on-camera conversations. Furthermore, the automatic reframing (AI Reframe) adjusts the format perfectly to fit smartphone screens.
Animated subtitles have become the standard for grabbing attention on social media, you get the picture? Good news: this tool automatically generates and synchronizes them with incredible accuracy. It’s a huge time-saver for your daily workflow.
To top it all off, the AI B-Roll and thumbnail generator enhance your clips. These tools make the final result visually more dynamic.
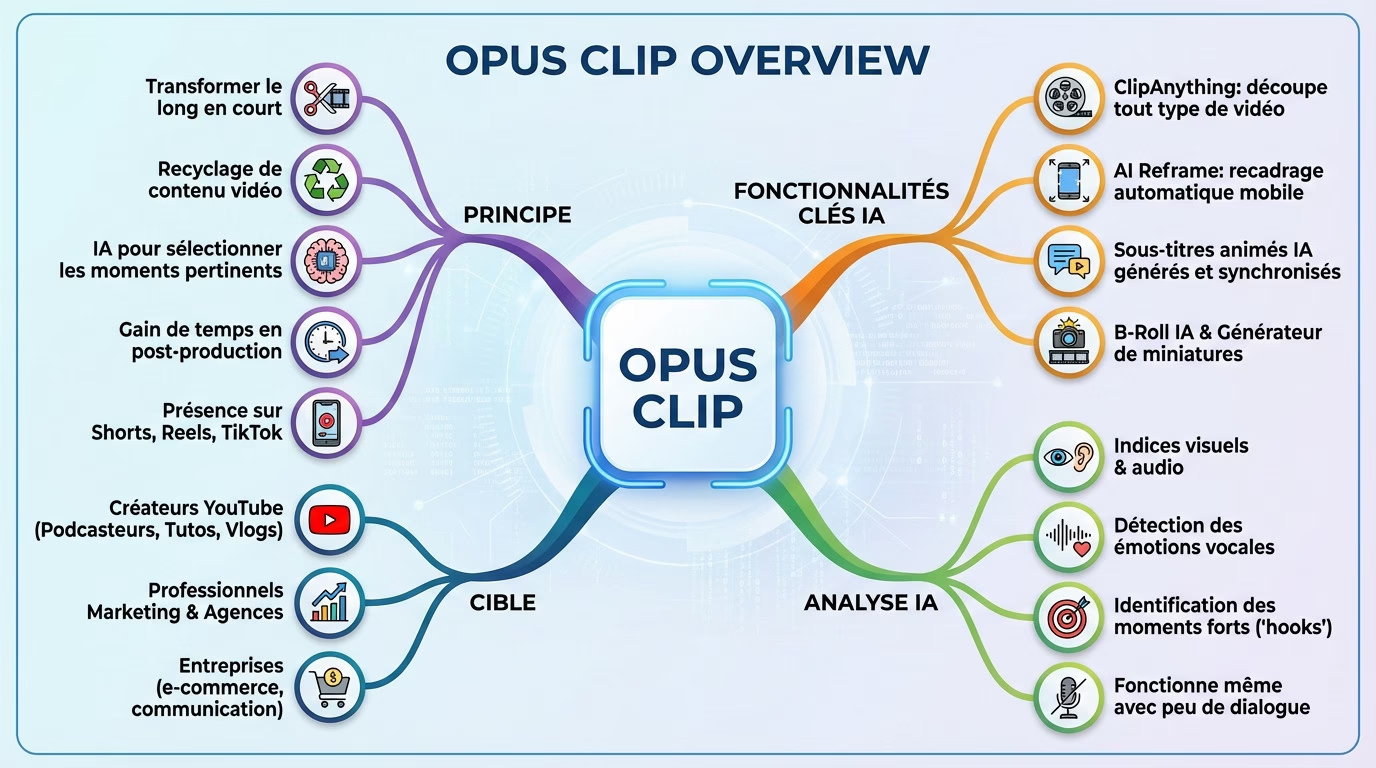
Who is this tool designed for?
If you’re a YouTube content creator, podcaster, or vlogger, this tool is definitely for you. Anyone already producing long-form videos can immediately take advantage of it to multiply their reach. It’s the best way to expand your audience without any additional filming effort.
Marketing professionals and agencies also benefit. For them, it’s a radical way to reduce video editing costs.
Finally, e-commerce companies that want to use video for their communication without spending days on it have every reason to get on board.
What AI analyzes to choose the extracts
It’s important to understand that AI doesn’t rely solely on spoken words to make its choices. It examines visual cues, audio, and even detects peaks of emotion in the voice. It’s a comprehensive analysis.
It even works very well on videos with little dialogue. The AI hunts for key moments, the famous “hooks,” capable of capturing attention in a fraction of a second.
The practical guide: from your long video to viral clips
Step 1: Import your source video
To begin this clip guide, provide the tool with the raw material. Simply paste a YouTube link into the designated bar. You can even connect your channel so it automatically retrieves your latest posts without any manual effort.
Your files aren’t online? Don’t worry, the upload option is there for that. Import a video file directly from your computer; it’s ideal if your content isn’t yet public.
A tip for beginners: choose a video where you talk a lot to the camera. The AI will perform much better.
Step 2: Guide the AI with your preferences
Before clicking the analyze button, take a moment to configure the AI. You can give it specific instructions. This is a crucial step if you want to avoid generic results and get the most out of it.
Adjust the clip length, for example between 30 and 60 seconds to conform to Shorts standards. Also use text prompts to highlight specific themes and force the tool to search for what matters.
Try a simple instruction like: “find the moments when I talk about the drone’s battery”. It’s drastic.
Step 3: Clip generation and virality score
Click the generate button now and go make yourself a coffee. The analysis takes a few minutes while the AI scans everything. In the background, it cuts the sequences, adds subtitles, and crops to vertical format.
Opus Clip then assigns a “virality score” to each generated clip. This score, from 0 to 99, assesses the clip’s potential. This allows users to quickly identify promising clips with the potential to go viral.
Keep in mind that this score is an algorithmic suggestion. Your creative instinct remains the only reliable judge.
A first look at the results
Once the processing is complete, you’ll see a list of clips ranked by virality score. Each video already has animated subtitles and is cropped to focus on the subject. The bulk of the work is done.
However, the work is not finished yet. This is where the adjustment phase begins. Consider these proposals as a solid foundation that now needs refining to achieve a perfect result.
Take back control: the slim edition for a perfect result
AI did most of the work, but the devil is in the details. That’s where you come in to transform a good clip into an excellent video.
Text-based editing: a disconcertingly simple approach
Opus Clip transcribes your video in its entirety, allowing you to edit without touching the timeline. This is where the magic happens: to cut a sequence, simply delete the corresponding sentence in the text. It’s a visual and incredibly intuitive method.
This approach allows you to remove filler words like “uh” or “so” in a flash. The AI often does this automatically, but you can fine-tune the cleanup manually.
Frankly, this is the feature that changes everything for those who are not professional editors.
Manual cropping and subject tracking
By default, the AI focuses on the face of the person speaking, which makes sense most of the time. But imagine you want to show a product you’re holding? Automation has its limits, and that’s where this clip guide becomes indispensable.
Fortunately, you can adjust the shot manually using the “Crop” option. Move the focus area for each specific shot.
This ensures that the actual action remains visible on the screen, not just a talking head.
Enrich with relevant b-roll using AI
AI B-Roll is the secret weapon for livening up a video that’s a little too static. This feature automatically overlays illustrative images onto your narration. It breaks the monotony and keeps the viewer’s attention, especially in short formats.
The system scans your keywords and searches image banks to find what fits the context.
A friendly piece of advice: use this sparingly to illustrate a strong point, not to drown out your message.
Applying your own style: brand templates and logos
To stand out from the crowd, customization is essential using “Brand Templates.” You can create a unique template with your own colors and fonts (OTF or TTF files). This ensures immediate visual consistency across your feed.
You can also add your logo as an overlay via the dedicated tab. The tool securely attaches it to all generated clips.
This is the finishing touch to make AI content your own and establish your brand image in the long term.
Adapt your clips for TikTok, Reels and Shorts
Specifics for TikTok: the pace and the hooks
TikTok is a race against time to grab users’ immediate attention. Your video absolutely must start with a striking phrase or a powerful visual action to stop the scrolling. If you miss those first three seconds, the viewer will ruthlessly skip to the next video. That’s the golden rule for survival here.
With your clip guide, use the text editor to cut out any slow or unnecessary introductions. Get straight to the point without hesitating for a second. Aim for fast-paced clips under 30 seconds to maximize retention.
Colorful and dynamic subtitles are your allies for those watching without sound. Customize them directly in the tool to make them really pop.
Optimizing for Instagram Reels: Aesthetics and the Loop
Reels audiences are often more demanding when it comes to visual aesthetics than on other social media platforms. The image quality of your source video must be impeccable to stand out from the crowd. Also, consider creating that famous “perfect loop” that literally hypnotizes the viewer. It’s this small detail that makes all the difference.
My advice: make the most of Opus Clip’s AI B-Roll to insert polished cutaway shots. It instantly makes the video look more professional.
To create a loop, cut off the end of your sentence so that it flows naturally back into the beginning. The repetition effect is powerful.
Thinking about YouTube Shorts: Value and Context
On YouTube Shorts, the mentality is different: people want to learn something, and fast. Your clip must deliver concrete information, a technical tip, or a solution to a specific problem. The perceived value must be immediate to capture the attention of this curious audience. Don’t beat around the bush.
Prioritize excerpts that act as mini-tutorials or clear answers to a question. This “educational” format is the most successful.
Here, you can extend the duration up to 60 seconds if the content is dense. The important thing is the relevance of the information.
Manage formats and subtitles for each platform
Opus Clip automatically handles the 9:16 aspect ratio, which is a huge time-saver for creators. But beware of interface pitfalls, especially on TikTok where the bottom of the screen is very cluttered. Part of your video might be hidden by the app’s captions.
Carefully check the position of your subtitles before confirming the export. Make sure that no text ends up hidden under the buttons.
Fortunately, you can adjust the vertical position of the subtitles in the Opus Clip editor. Move them up a bit to avoid disaster.
Finalization and distribution: export and publish your creations
Once you’ve finalized your edit, you need to retrieve the file. If you particularly like a clip, download it directly to your hard drive. The file arrives in high definition, ready to use. It’s the fastest way to confirm the result.
Spotted ten gems in a single long video? Don’t waste your time clicking ten times, use the “Download all” function. This lets you retrieve everything at once in an archive.
I highly recommend this method if you’re using an external programming tool. It allows you to keep a clean local copy.
Direct posting to your social media
Why leave the interface if you don’t have to? Opus Clip connects directly to your TikTok, YouTube, or Instagram accounts. This allows you to post your video from this Opus Clip guide without switching tabs. It’s a huge improvement in efficiency.
You can also plan ahead and fill in your editorial calendar. Simply set the exact date and time for each video. The tool will handle the uploading while you sleep.
This is frankly the best solution for those looking for an all-in-one workflow. It eliminates unnecessary file transfers.
Exporting to Premiere Pro and DaVinci Resolve for professionals
Sometimes, automation isn’t enough for demanding editors. If you want to push the boundaries of retouching, the tool doesn’t lock you into its ecosystem. You have the freedom to export your project and work on it elsewhere. That’s where the magic happens for experts.
Simply select the XML export option from the menu. This small file contains all the cut data for your sequence.
Then open Adobe Premiere Pro or DaVinci Resolve to import it. Your cut will be intact and you can continue working.
Managing your projects and models
Rest assured, your work won’t disappear after exporting. All your projects will remain safely stored in your personal dashboard. You can return to it anytime to correct a mistake or change a title. It’s an essential security feature for everyday use.
Also, remember to lock in your visual identity with brand templates. Configure your fonts and colors once, then apply them everywhere. Your future videos will adhere to your brand guidelines with a single click.
Pricing and subscriptions: which Opus Clip plan should you choose?
It all sounds great on paper, but how much does it actually cost? Let’s take a look at the different options to see which one best suits your needs and, above all, your budget.
The free plan to get started (and its watermark)
Opus Clip offers a “Free Forever” plan with 60 credits each month. It’s perfect for testing the tool without paying a cent. You’ll discover how the AI automatically generates your clips. A great way to start your personal Opus Clip guide.
One major drawback, however, is the watermark imposed on the image. Every exported video will display the brand’s logo right in the middle. This is far from professional for your social media.
My opinion is clear: it’s fine for testing, period. It’s impossible to build a credible image with that visible logo.
Paid plans: Starter and Pro explained
The $15-per-month “Starter” plan is a real game-changer. It removes the watermark and gives you 150 monthly credits. You also get unrestricted 1080p export. It’s the entry ticket to a clean, professional-looking result.
The “Pro” plan costs $29 but unlocks everything. You get 3600 annual credits and XML export for Premiere Pro. Access to two crew seats is also included.
Ultimately, your choice will depend on the volume of videos you release. If you produce a lot, the calculation is quickly done.
For agencies and businesses: the premium plans
Beyond that, the “Business” offering is clearly aimed at larger organizations. It allows for the management of multiple users with personalized access. Video processing becomes a priority to save time. It’s a tailor-made solution for high volumes.
Marketing agencies managing multiple clients will undoubtedly find it beneficial. It’s the only viable option for centralizing a massive and complex production without ending up tearing their hair out.
My opinion: which subscription is right for which type of creator?
If you’re a solo creator, the Starter plan is more than enough. With one long video per week, you won’t use up all your credits. Save your money for other tools. It’s the best value for money right now.
Go for the Pro plan if you want a unique visual identity. The multiple brand templates justify this investment.
Friendly advice: start small with the free plan. If you like the tool, you can always upgrade to a paid plan.
Opus Clip is a game-changer for your video content strategy. You’ll save valuable time by automating editing and subtitling. Don’t forget to refine the results to maintain your personal touch. Try the tool for free now and start boosting your social media presence.


Leave a Reply